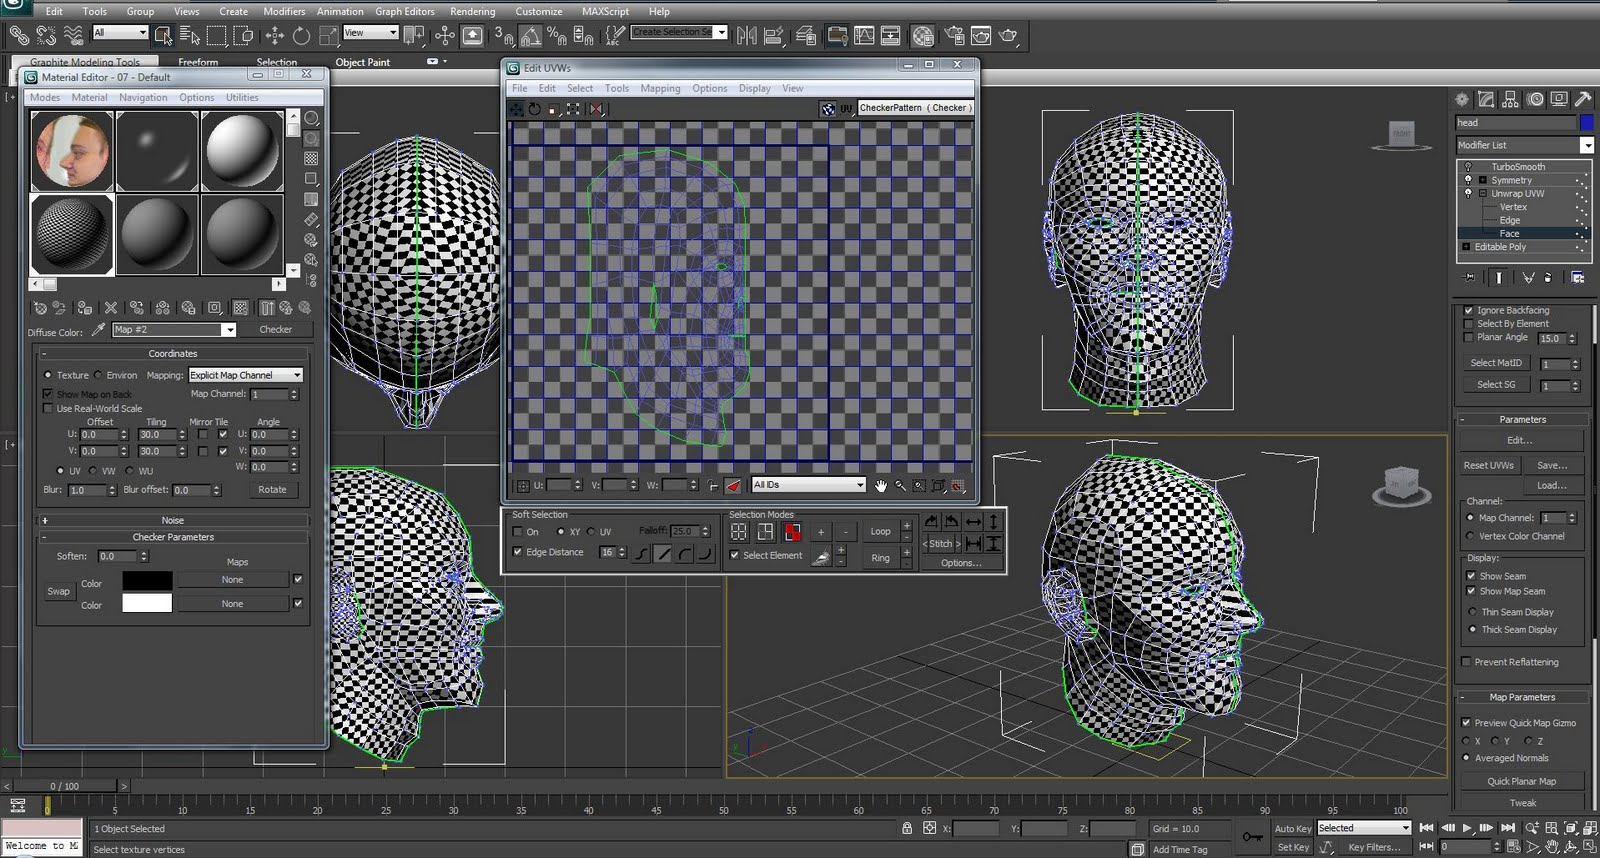
The modelling of the head is finished at this stage. Next step is to set up the mapping coordinates. It have started by applying Unwrap UVW modifier after editable poly modifier. The symmetry will be used later on to duplicate the mapping on the other side of the head model. When in unwrap uvw modifier sub-object mode I selected Face and selected all polygons of my head except the ear. With polygons selected I used cylindrical in map parameters. Then I scaled and moved the cylindrical gizmo to fully cover the head model and moved it to the edge of the model to have one solid seam. Then in material editor window the checkers texture was created by selecting an empty sample slot and applying checker map in diffuse options. The tiling parameter was increased to 30. The material was applied to head model by dragging it on the head. This map was used to see where unordinary stretches occur in the mapping. Back in UWV modifier edit uvw window was opened from parameters sub-menu. In edit UWV window Options menu tile bitmap checkbox was unselected and constant update was checked in order to see how changes in mapping affect model in the viewport. To start with setting up texture coordinates I selected all head faces and and flipped them horizontally with mirror tool. Then I started to select the vertices where map stretching is unordinary and started to relax them with relax tool from tools menu. With relax tool I fixed parts at top of the head and neck also areas around the nose and chin. Then I kept on moving vertices around the eye area and nose to clean up small errors in the mapping. Then I checked if there are any inverted or overlapped faces in the mapping and fixed them accordingly until I was satisfied with mapping.


The next part was to set up mapping coordinates for the ear. The ear polygons were selected and planar fit was selected in map parameters sub-menu. Then Pelt was selected and new break point for the ear map was created with point to point seam. Then in Pelt edit uvw window the outer ring was scaled and shaped as a circle. Back in Pelt dialog box start pelt was selected to make ear map flat. Then the ear map was scaled down to match the map of the head. Then ear UVW map was cleaned up by moving some points and fixing overlapped and inverted faces.

The next part was to set up mapping coordinates for the ear. The ear polygons were selected and planar fit was selected in map parameters sub-menu. Then Pelt was selected and new break point for the ear map was created with point to point seam. Then in Pelt edit uvw window the outer ring was scaled and shaped as a circle. Back in Pelt dialog box start pelt was selected to make ear map flat. Then the ear map was scaled down to match the map of the head. Then ear UVW map was cleaned up by moving some points and fixing overlapped and inverted faces.
To create the UVW mapping on the duplicated head part the new unwrap UVW modifier was applied after the symmetry modifier. Then faces of the symmetry part were selected and mirrored to the other side. The layout was positioned next to the original map. Then maps were connected together by welding vertices in the center of the face. Afterwards the map layout for duplicated ear was created using same method as for the head.

The UVW layout was scaled down to fit mapping box. The layout was turned to an image by going to tools>render UVW template. The created image is going to be used in a Photoshop as a guide for creating head map texture.

No comments:
Post a Comment